Saturday, April 30, 2011

Citrus Salmon for Easter


Don asserted a few weeks ago that the main course for any Easter dinner had to feature something that ends in “am.” He was hoping for lamb.
 But I amended the rule to include things that had the “am” sound anywhere in the word, and so, cooked salmon.
We started with radish slices sitting on a bed of creme fraiche with radish sprouts on top. I found tamari black sesame brown rice crackers at the local bakery, and they were crispy, salty and perfect. 
If you haven't ever tried olives with garlic cloves inside, you should.  Buy them from a grocery store olive bar though and not the jarred variety -- the garlic in the former is crunchy (but not at all overpowering in case you're worried) while the garlic in the latter is  soft and mushy.     
I marinated the salmon in orange juice and ginger. It could have used a bigger kick --maybe with some lemon juice and garlic. Poaching the salmon in the microwave was quick and easy (same technique as my halibut recipe). On top of the salmon was a relish with orange pieces, ginger, red onions (with some extra radish spouts tossed on top).

Dessert was lemon meringue pie--no comment necessary! 

Thursday, April 21, 2011

Chicken Sandwiches on Panini

We had grilled pineapple for dessert last night--with drained yogurt flavored with orange juice, orange zest, honey and orange extract. There was still lots of pineapple left over, so I contemplated having chicken curry for dinner.
But when it came down to it, I just didn’t feel like cooking curry. We always end up eating way too much because it’s so easy to pile the rice and curry and bananas and pineapple and peanuts and raisins and yogurt on your plate. Whew!
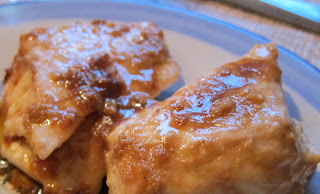
 But these chicken sandwiches hit the spot. I’m amazed that these days we are meeting the USDA 2010 Dietary Guidelines for Americans and limiting our meat  portions to about 3 ½ oz. When you follow Michael Pollan’s recommendations to use meat primarily as a condiment (as in stir-fries, salads, and sandwiches), it turns out that, amazingly enough, one large chicken breast really is enough for two people.
   
Mmmm. These rolls smelled yeasty and fresh--from Pane d'Amore bakery.


The cheese was Campfire from Mt. Townsend Cremery, also sold at the bakery.

 
Sauteed kale with garlic before cooking.


And after cooking.


Roasted sweet potatoes--400 degrees. Turn in 20 minutes and again in 10 minutes.


Thursday, April 14, 2011

Sushi 101


Did you know that fish who spend any time during their lives in a river need to be either cooked or frozen before you eat them so the river parasites the fish eat won't infect you?
With that appetizing thought, my sushi instructor in Sushi 101 passed out the bowls of raw salmon mixed with chile garlic sauce that we could use in rolling our first sushi roll (it had previously been frozen of course).


Don gave me this three-hour class as a birthday present and I went last Friday night, along with 7 other students—two couples, a mom and daughter and two other single women. Our teacher was Hiro, a chef and owner of Chiso’s sushi restaurant in Fremont.


Here’s what I learned:
1) Wash rice vigorously at first, rinsing it 2-3 times; continue to wash it less vigorously another 2 times and let it sit in water to rehydrate about 30 minutes before cooking. (Maybe I'll do the rinsing part, but resting for 30 minures? Not.)

2) For sushi rice, use a 2:1 mixture of sugar and vinegar plus some salt. Add kombu, a type of seaweed, if you have some. Kombu is really high in vitamins and minerals.
3) Buy a rice cooker. Hiro asked how many of us owned one.  We all did. He said that they sell so many for a reason – they offer fool-proof rice cooking.
4) When rolling sushi rolls, the textured side of the nori goes on the inside and the shiny side out.
5) When cutting sushi, dip the tip of your knife in a bowl of water and let it run down the front and back. Do this as often as you need to.
6) I really like avocado, cucumber, radish sprouts, cooked crab, cooked shrimp and smoked eel in sushi, with pickled ginger on top. Salmon and the fish roe, not so much.

We started with temaki, or hand rolls.


This was my favorite shape.   It was easy to roll and I liked eating it in several bites instead of popping one big sushi bite into my mouth.


Next were traditional American sushi.


I did OK on these.


Hosomaki, or thin rolls, have nori on the outside. These were supposed to be only quarter size piece – nice because they were so easy to eat – and traditionally made with only one ingredient. They were a bit boring though with only cucumber.
  
Futomaki, or fat rolls, are pieces with the nori on the outside, rice on the bottom and one topping (this one has crab). These were the very easiest to make and what I think I would make in the future. You use wide strips of nori and make one piece at a time.


Uramaki, or inside-out rolls, were very pretty with black sesame seeds sprinkled on the rice, but they were the most difficult for me to make and pretty much fell apart when I cut them. The woman sitting next to me had more luck with hers.

I like the flavors of sushi, but may just resort more often to something that Hiro mentioned and that I have in fact made from a recipe in a Gourmet magazine a number of years ago – Sushi Rice Salad. 

Here’s my abbreviated version:
Toss cooked rice (I use brown rice) with a sugar-vinegar-salt dressing and add cut up bits of the same ingredients you would use in a sushi roll.

I like to put in shrimp, avocado, cut up bits of nori seaweed, chopped cucumbers and for added crunch, some diced carrots, a few peanuts or maybe edamame.
Hiro made this caterpillar roll at the end of class.

Leftovers!


Tuesday, April 12, 2011

Fresh Strawberry Pie for Dessert--from generations of pie contest winners

   
This is a great pie for warm summer days. Or, for those of you who live in a place where strawberries are in the store but the weather is still cold and dreary, the pie is a springtime treat to remind you that warm summer days may arrive eventually. (We hope.)

What I like about this pie is that it uses fresh strawberries as well as a strawberry jam filling. We eat it topped with a little vanilla yogurt doctored up with orange juice, orange extract, honey and orange zest.

I also like the fact that my mother gave me the recipe. She got it from Grace Dietz, an elderly neighbor from our time in Chico, California. Mrs. Dietz won Best Cook in Corning CA in 1966 for her strawberry pie recipe.
For the crust, I like to use a pastry recipe from my daughter Kate, winner of the Johnson Count, Iowa 2008 Best Pie Crust contest at the Johnson County fair. I must admit though that she won the contest for a different pie crust, not this oil version.

I like that this crust is really easy to roll out and that it has a fall-apartness, which I find appealing. Rolling pie crusts has never been my forte. I use wax paper above and below the dough when I roll out the crust, with the bottom paper stuck to the counter with a little water. (Kate also recommends the Cook's Illustrated crust that uses vodka--it evaporates as the crust cooks. Her Christmas pecan pie this year used the vodka crust.) 
Fresh Strawberry Pie
Baked 9” pie crust
1 1/2 large strawberry container
¼ cup cornstarch
1 cup sugar
Pinch salt
1 cup water
  
Let the pie shell cool thoroughly before filling.

Crush 1/3 of the berries. Slice the remaining 2/3 berries and set aside, saving a few whole berries for garnish. Combine the cornstarch, sugar, crushed berries, salt and water and cook until thickened, then continue cooking for a few more minutes until the mixture becomes clear.
 
Place ½ of the sliced berries in the pie shell. Add ½ of the thickened berries. Add the remaining berries and top with the remaining thickened berries. Let the pie cool in the refrigerator until it is set.

From Eleanor, May 1985


Oil Pastry Crust
8-INCH OR 9-INCH ONE-CRUST PIE
1 cup plus 2 tablespoons Gold Medal Flour
½ tsp. salt
1/3 cup salad oil’2 to 3 tablespoons cold water

10-INCH ONE-CRUST OR 8 OR 9-INCH TWO CRUST PIE

1 ¾ cups Gold Medal Flour
1 tsp. salt
½ cup salad oil
3 to 4 tablespoons cold water

10-INCH TWO CRUST PIE

1 2/3 cups Gold Medal Flour
1 ½ tsp. salt
¾ cup salad oil
4 to 5 tablespoons cold water

Measure flour and salt into bowl. Add oil; mix until particles are the size of small peas. Sprinkle in water, 1 tablespoon at a time, mixing until flour is moistened and dough almost cleans side of bowl. (If the dough seems dry, add 1 to 2 tablespoons of oil. Do not add water.)  Gather the dough together; press firmly into a ball.

For one-crust pie:  Shape the dough into a flattened round. For two-crust pie, divide the dough in half. Place the flattened round between two strips of waxed paper. Wipe the table with a damp cloth to prevent the paper from slipping. Roll the pastry 2 inches larger than an inverted pie pan. Peel off the top paper. Place the pastry, paper side up, in the pan. Peel off the paper.

Complete as with any crust. A baked pie shell requires 12-15 minutes at 475 and a standard pie.
From Kate, @2000


Friday, April 8, 2011

Minestrone

Here’s how I roll: If we have something completely healthy for dinner, like minestrone, then I get to load up our salad with lots of blue cheese and cashews. Not a bad trade off really, because I love minestrone.

Plus, we always have crusty bread with minestrone, which I also love. In fact, Don said he married me in part because he had never met anyone who loved good bread as much as he did. (I try not to be like my grandmother and load on two inches of butter on the bread—I limit myself to only ½ inch for sure.)
If it doesn’t have zucchini, I call it vegetable soup and not minestrone. I also must have a bit of spinach in minestrone. Frozen spinach is something that is always in my freezer. Last night I used a small bit of spinach that had already been thawed and squeezed out, so I could just plunk it directly into the soup. If that small bit hadn’t been there, I would have gone ahead and microwaved a whole package, used a bit and put the rest back into the freezer for the next batch of soup or quiche.
In my mind, minestrone used to mean soup with those cute, small pasta shells. They were great the first day, but if I had any leftovers, the shells expanded and weren’t so cute anymore. These days, I skip them altogether.
Lately, my minestrone cooks with Parmesan rinds, which add a bit of je ne sais quoi (as well as teeny bits of tasty Parmesan) to the soup. I always mean to make minestrone into soupe au pistou, but  fresh basil is never in my fridge and I never seem to want to take the time to  add minced garlic at the end—next time I think I will.
Here’s my recipe:
Sauté ½ chopped onion. Add 2 to 3 cloves of garlic and sauté another ½ minute.
Add one can of chopped tomatoes, some vegetable or chicken stock (about 2 cans or one foil package). Let the mixture simmer for ½ hour or more.
Add 1 can of Great Northern or Navy beans, 1 zucchini, some frozen spinach and a small amount of any other left-over vegetables you feel like tossing in (I especiallyt like green beans in minestrone, but last night, I added about ¼ cup of canned corn that was still around from the sloppy joes a few days ago).
Cook just until the zucchini is almost cooked through.
Add ¼ to ½ cup of chopped parsley or cilantro.

Wednesday, April 6, 2011

Sloppy Joes

I had a red pepper that I needed to use, so decided to make Sloppy Joes for dinner last night. They’re so wonderfully retro.
I decided to have carrot and raisin salad with Sloppy Joes because 1) I like carrot and raisin salad,  2) it too has a retro feel and 3) Don gave me a food processor for my birthday and I wanted to use the grating blade. 
Sloppy Joes
Sauté @ 1/2 cup chopped onion and 2 cloves of chopped garlic.
Add 1 finely chopped red bell pepper and sauté until soft. 
Remove the vegetables and cook ½ lb. of hamburger. Drain it well.
Add the vegetables back in along with @ 1/2  cup to ¾ cups of ketchup, a few shakes of Worcestershire sauce and a few shakes of Tabasco sauce. Heat thoroughly. 
I sometimes add additional ketchup or some water to get the right consistency—you’ll know it when you see it. Last night I had some left-over corn from chicken enchiladas the night before, so I added about 1/2 cup.
Serve over buns heated in the oven.

Sunday, April 3, 2011

Brunch

I rarely have brunch. We do go out for lunch sometimes on the weekend and have omelets or pancakes, but that always seems like lunch and not brunch. So not only did we get to have a real brunch this weekend, but we got to visit with our good friends Kathleen and David as well.
Brunch was a frittata with a crispy hash-brown crust, blue cheese inside and asparagus and Hempler’s nitrate-free bacon on top – I’d have it again any time. Not to mention Kathleen’s homemade walnut, fig and fennel bread. I think I should eat brunch more often!
Kathleen and David are not 100 percent off the grid at their house in the hills above Quilcene, Washington, but they are aiming for something close to that, with solar panels, three gigantic cisterns on the edge of the property and thoughtful green technology throughout the house that they built. David is a woodworker who creates beautiful cutting boards and wooden boxes when he is not working on someone’s new kitchen cabinets or building his own house – you can see one of his cutting boards and more of his work by clicking here. Kathleen is a talented jeweler and ceramics artist.
   
Interspersed with a tour of their property and catching up with family news, Kathleen showed me her favorite cookbook. She noted that if she could only have one cookbook, this would be the one. Hmmm. . .an interesting question for another blog post – What is my must-have cookbook?

Saturday, April 2, 2011

Halibut in the Microwave

Like everyone else, I take the microwave for granted. Sure, I use it to warm my soy milk for coffee every day, cook my oatmeal in the winter, heat leftovers for lunch or dinner and have the occasional cup of tea or bag of popcorn. But by-and-large, I think cooking in the microwave is somehow, how I shall put it . . . not really cooking.  Maybe my microwave repertoire is just too limited?
However, I do think fish cooked in the microwave is fantastic!
Mostly I just pan fry salmon and other fish and use my snazzy grill pan for shrimp. But when I want to poach salmon or halibut, or just cook any fish exactly right, the microwave is perfect. About 1 ½ minutes on each side does the trick—sometimes that is even too long if the fillets are smallish. I let it rest for another minute or two. And the fish comes out perfectly flaky and done just to the point of tenderness.
A number of years ago I had some halibut cooked this way at the grocery store tasting station, cooked with a ginger-garlic-soy sauce marinade. That’s one of my favorite ways to cook halibut now. Since it’s just the two of us, buying halibut seems like a reasonable treat when it’s fresh and in season.
For two 7 oz. fillets:
In a glass baking pan, mix a 2 to 3 inch piece of fresh ginger with your microplane grater (you should really get one—they’re wonderful for zesting citrus too). Add two medium cloves of garlic (pressed with your garlic press), about ¼ cup of soy sauce and olive oil, and a few shakes of sesame oil. Turn the fish to coat and let it sit for an hour or so (or ½ hour if that’s all the time you have).
Cover the dish and microwave for 1 ½ minutes. Turn the fish and microwave on the other side. Test it with a fork to see if the fish flakes perfectly. If not, zap for another 30 seconds to one minute. To serve, spoon the marinade over the top if you would like. Last night we had roasted sweet potatoes, broccoli and a spinach salad with our halibut.